Affiliate links on Android Authority may earn us a commission.Learn more.
Flutter UI Toolkit: Creating a cross-platform, infinite scrolling ListView
August 10, 2025
Whenever you create a mobile app, you want that app to be compatible with as many different devices as possible. For Android, this means designing for devices with a range of hardware, software and screen configurations, but if you want your app to reach the largest possible audience, then you’ll need to move beyond Android, and make your app available on other mobile platforms.
After Android, many mobile developers turn their attention to iPhones and iPads, but porting an existing Android app to iOS requires time and effort – wouldn’t it be easier if you could just create a single codebase, that runs onbothAndroid and iOS?

Flutter is a user interface (UI) toolkit that aims to do exactly that. In ourintroduction to Flutter article, we explored this new toolkit, and used it to create several simple apps. In this follow-up, we’re moving beyond Hello World and creating an app that more accurately reflects how you might use Flutter in the real world.
By the end of this article, you’ll have used Flutter and Dart to create an infinite scrolling list, populated by data pulled from two external Dart packages – and all without a single Adapter in sight!

Setting up your development environment
To follow along with this tutorial, you’ll need to have installed the Google Flutter SDK, and added the Flutter and Dart plugins to your Android Studio installation. If you haven’t already completed this setup, then we walk you through this process inGoogle Flutter – what is it, and how to use it for cross-platform app creation.
Getting started: Hello World with Flutter
In this article, we’re going to build an app that consists of an infinitely scrolling ListView. As the user scrolls, the ListView will be populated by new data that’s randomly generated with the help of two external Dart packages. This data can be anything you want, but I’m going to create a “Temporary Password Generator” that supplies a list of made-up names, and a temporary password that this person can use to log into their account for the very first time.
The first step, is creating a new Flutter app:
Open your project’s main.dart file, and you’ll see lots of boilerplate code (and if you’ve followed along with ourfirst Flutter tutorialthen all of this code should look familiar!)
To make things easier, let’s replace all of this boilerplate with a simple “Hello World” app:

Run this application, either by attaching a physical Android smartphone or tablet to your development machine, or by launching an Android Virtual Device (AVD), and then selecting “Run > Run” from the Android Studio toolbar.
After a few moments, your app should appear onscreen and display a “Hello World” message.

Project failing to compile? Handling Dart:UI errors
When you attempt to run a Flutter application for the first time, you may encounter the following error:
The built-in library ‘dart:ui’ is not available on the stand-alone VM. library handler failed export ‘dart:ui’

If you see this message, then it usually means that Android Studio is configured to run your project as a Dart command line app, instead of a Flutter application.
To check whether this is happening in your project, select “Run > Edit configurations…” from the Android Studio toolbar. If “Dart Command Line app” is selected in the subsequent window, then you’ve found the source of the problem! To fix it:
You should now be able to run your project without any problems.
Don’t reinvent the wheel! Using external packages
When creatinganyapp, you’ll want to focus your time and energy on perfecting the features that make your application unique, rather than churning out the same, repetitive boilerplate code that crops up in countless apps.
So, why waste time writing boilerplate code yourself, when there’s an entire repository of third party Dart packages that you can use in your Flutter projects? ThePub package repositorycontains packages that cover a wide range of common use cases, includingissuing network requests,implementing Google Sign In, andreading and writing key-value pairs.
Eventually, we’ll populate our ListView with data from two different Dart packages, but for now let’s just replace the app’s static “Hello World” message with a randomly-generated name, provided by theFaker package.
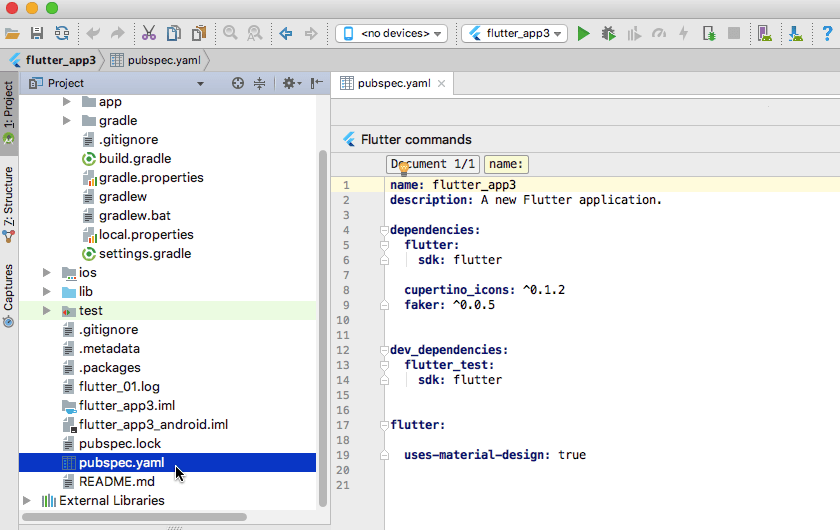
You add external packages to your Flutter project, via its pubspec.yaml file. At its simplest, you declare a package dependency by adding its name to pubspec.yaml, but it’s recommended that you specify the range of versions that your app is compatible with, for example whether it’s only compatible with Faker 0.0.5, or Faker 0.0.1-Faker 1.0.0.
Dart uses semantic versioning, where breaking changes are indicated by increasing the major version number. If your project works fine with version 1.1.2 of an external package, then according to semantic versioning it should work with all releases up to, but not including version 2.0.0, which will be the next major breaking change.
You specify a range of versions using the caret syntax (^), for example ^2.2.3 means that your project is compatible with version 2.2.3, and all subsequent releases up to version 3.0.0.
Open the pubspec.yaml file and add the Faker package. At the time of writing, the most recent release was Faker 0.0.5, so I know that my project will be compatible with all releases up to Faker 1.0.0.
Next, you need to import the Faker package, so switch to your project’s main.dart file and add the following:
Displaying randomly-generated data
According to theFaker usage examples, we can generate a name using faker.person.name(), so we simply need to replace our “Hello World” text with this line:
Run this app on your physical Android device or AVD, and you should see a name in the centre of the screen. Try exiting and relaunching this app a few times, and a new name should appear each time.
Creating stateless and stateful widgets
In Flutter, widgets can either be stateless or stateful.
A StatelessWidget contains no State; all of its values are final and cannot change at runtime. Our app already contains an example of a stateless widget:
By contrast, a StatefulWidget contains State information that can change at runtime. A StatefulWidget consists of:
To create our list, we need a stateful widget (I’m calling mine RandomNames) and a corresponding State class (RandomNamesState).
Here’s my RandomNames class, which simply creates the associated State class:
Next, we need to create the RandomNamesState class, which contains the build() method where we’ll generate the random name:
Finally, we need to remove the name generation code from our project’s MyApp class, and point it in the direction of the RandomNames class instead:
Adding more Dart packages: Random Words
I’m going to create a “temporary password” for every name in the list, by combining two random English words into a WordPair. I’ll generate these WordPairs using therandom_words package, so let’s add this package as our second project dependency:
Create an infinite scrolling ListView
When it comes to displaying scrollable content, Dart provides a ListView widget that’s similar to Android’s standard RecylerView.
There’s a few different ways to construct a ListView:
In addition to ListView.builder, we’ll be using the itemBuilder property, which is called once per ListView item, and is responsible for placing new content in each row. The itemBuilder property accepts two parameters: BuildContext, and the row iterator “i.” The iterator increments each time the function is called, which allows the list to grow indefinitely as the user scrolls.
Here’s the first part of our ListView code:
Here, the _listContent() function is calling _buildRow(), which returns another new element: aListTilewidget.
We use ListTile to define each list item’s content and structure, such as its title, body text, and any images we want to use. As a minimum, a ListTilemustcontain a title attribute.
Let’s define a ListTile that uses the randomly-generated name as its title:
Note that all ListTiles are a fixed height, so they won’t grow or shrink to accommodate your content. If you need resizable rows, then you should use aRow widgetinstead.
Constructing your list items: Adding a temporary password
Once you’ve defined a basic ListTile, it’s easy to add more content to your ListView.
To add a “temporary password,” plus some supporting text, simply update the ListTile block:
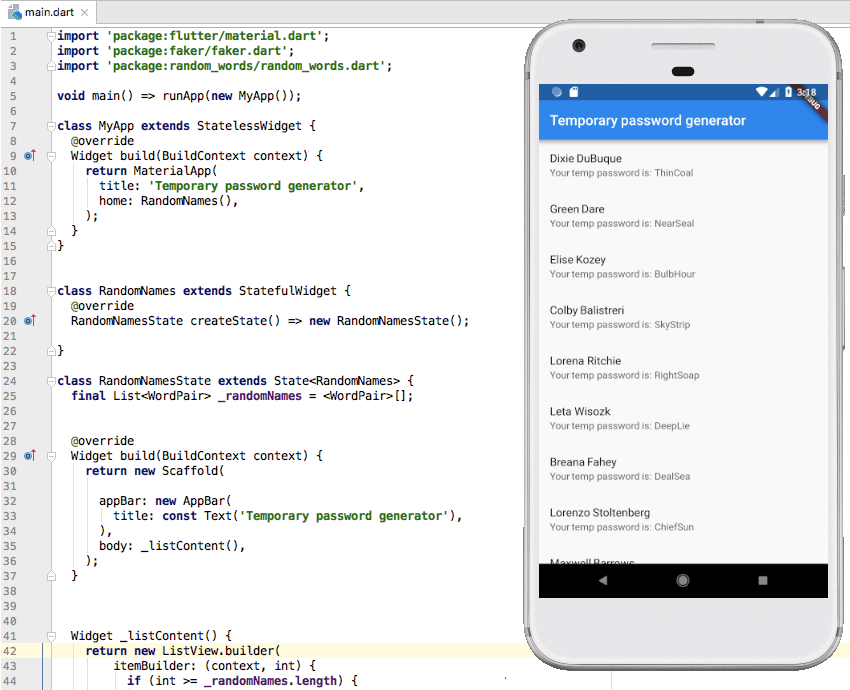
By this point, your main.dart file should look something like this:
Run this project on your Android device, and you should encounter a functioning ListView. Scroll the list, and the external Dart packages will generate more names and temporary passwords automatically – no matter how far or fast you scroll!
Theming your app with color swatches
Let’s finish up by modifying our app’s appearance, using Flutter’sThemeDataclass. This class has a wide range of attributes that enable you to change everything from the foreground color of your app’s widgets (accentColor), to the background color of dialog boxes (dialogBackgroundColor) and the highlight used for selected text (textSelectionColor).
I’m using “primaryColor” to change the color of the app bar, and “scaffoldBackgroundColor” to change the color of the Material beneath the Scaffold, which is essentially the same as changing the app’s background color.
I’m also going to use color swatches, which are number-coded shades. The smaller the number, the paler the shade, and the greater the number, the darker the shade, ranging from 100 to 900 in increments of 100, with the exception of 50, which is the lightest shade. You can findexamples of all the available swatches, over at the Flutter docs.
In the following code, I’m using different swatches of teal for the app’s primaryColor and scaffoldBackgroundColor:
you may combine differentThemeData attributes, colors and swatches, to create different effects.
Wrapping up
In this article we created an infinitely scrolling list, using Dart’s ListView component. We also looked at how you can speed up development time, using external packages from thePub repository.
Have you tried the Flutter toolkit yet? And are there anymore Flutter topics you’d like us to cover? Let us know in the comments below!
Thank you for being part of our community. Read ourComment Policybefore posting.